Rockingham House, Lough Key, Boyle: Then & Now Photoshop

I’ve been a regular visitor to Lough Key near Boyle Co. Roscommon from even before I moved to the Northwest of Ireland in 2003 and many times since then, including this afternoon for the first time in a good while when I decided to drop by in the rain to snap some photos of the remnants of the old Rockingham House Estate there which was destroyed by fire (for the second time) in 1957 then subsequently demolished, perhaps controversially considering it’s decent state, in 1971. The large foundations, still interspersed with servants tunnels and sprouting an ugly tower, which I initially thought reminiscent of something you’d see in Ballymun, Dublin, rather than in one of the great forest parks of Northwest Ireland is now a commercial tourist attraction.

I’d seen photos of the old house before but never really thought through what it must have looked like or where it stood or which direction it faced before until I seen another fairly hi-res and impressive colour photo of the house on Facebook recently. I decided to do some research, take some photos and Photoshop together how I thought it might have looked “Then Vs Now”, just to give anyone interested an idea..

Here are the results (CLICK)

Photo Gallery:

This slideshow requires JavaScript.

Some further references on Rockingham House and accounts of it’s demise:

http://www.boyletoday.com/57-years-since-rockingham-fire/

http://thegardens.ie/?page_id=918

https://www.irelandxo.com/ireland-xo/history-and-genealogy/buildings-database/rockingham-house-boyle


Photoshop CC Essential Basics Online Course

I’ve created a 9 Lesson online course in Photoshop CC basics for Photoshop beginners who would like to know how to do basic image editing. It’s suitable for:

  • Photographers,
  • Business Owners,
  • Marketing People,
  • Graphic Designers,
  • Web Designers,
  • Photoshop Hobbyists.

Requirements:

  • Basic computing ability,
  • A decent, modern Desktop or Laptop computer,
  • A cloud subscription to Photoshop CC (or the free months trial).

Topics Covered include:

  1. Where and how to get Photoshop,
  2. Photoshop Configuration,
  3. The Photoshop Interface,
  4. How to Open images,
  5. How to Crop images,
  6. How to Resize images,
  7. How to Add Text to an image,
  8. How to Save an image,
  9. How to Save Optimised images for the Web.

There’s also a Quiz at the end to test your new found knowledge!

The course is a total of 40 mins long and only €79 + VAT.

TAKE THE COURSE

Mohill Railway Station Leitrim Then and Now

I have Google alerts set to alert me whenever Mohill or Leitrim is in the news and one came in last week for old photos of Mohill Railway station for sale on eBay by an Australian seller of all things! The auctions were fairly high quality old photos from about 1950 looking from both ends of Mohill at the old railway station. All photos were from about the 1950s.

I loaded them on my phone and went out one fine day (it’s only around the corner from where I live) to take some modern day photos from as close to the old photo angles as possible.

I went back to the office and loaded each set of then and now photos in Photoshop and aligned them best I could before masking out certain sections to merge then and now versions in some meaningful way. Finally I added some adjustment layers above everything to improve levels, colour and contrast..

The Old Photos:

The New Photos:

The Results:

Photographing The Moon with a DSLR

Disclaimer: I’m a newbie at shooting the moon and an amateur photographer at best. This blog post just details my experience and learning curve on my first ever proper moon shoot recently.

I seen something online about the next full moon and since I’d just purchased a second hand telephoto lens for my Canon EOS 500D, I though I’d mark the date in my diary and try get some decent moon shots for once.

Step 1 – Find out when and where the next full moon is

I’d found out the date of the next full moon no problem but I’d gone as far as setting up my tripod and camera on the balcony out the back of my apartment before I realised that I didn’t know what time exactly the moon would appear and in what exact position. I remembered roughly having seen the moon out the back before so I knew it was in that general direction after dark but because I had a small viewing angle with trees and stuff, I needed to know precisely where the moon would be at a particular time. I used this website below to give me all the details I needed on moon positions for my location:

MoonCalc.org

I also used the handy “Sky Map” android app to show me the moon position and any other interesting objects close by in real time/augmented reality:

Sky Map App

Step 2 – Equipment and Setup

I’d found out that the moon was going to be in just the right position to shoot at about 1:45am so I setup everything I needed before I went to bed that night and set an alarm. Here’s what I used:

  • Canon EOS 500D (A camera is handy!)
  • 75 – 300mm Telephoto Lens (Not quite powerful enough for Pro moon shots but way better than a normal lens)
  • Tripod (Impossible without)
  • Wireless Hot Shoe Remote control set (You can’t be shaky at high zooms! The camera’s timer or a remote phone app will do here too though..)
  • Candles (As little light as possible in the immediate vicinity)
  • A Smartphone (To shine on your camera buttons and google “moon camera settings”!)

Step 3 – Shoot, Shoot, Shoot..

I ended up with 35 RAW images of the moon but deleted many more directly from the camera after checking the results in the camera LCD. The trick is to take a pile of shots, starting out with the generally accepted camera settings for photographing the moon, then varying things like Shutter Speed and Aperture to get different results. You really have to go full manual too as letting the camera try decide on the best settings for something that far away just doesn’t work.

In the end, the following settings seemed to work best for me:

  • Full Manual Mode
  • Shutter Speed: 1/125
  • Aperture: f/11
  • ISO: 100

Step 4 – Review

Getting the photos onto the computer and reviewing them is the fun bit. Sorting through to find that one photo (hopefully!) that stands out above the rest. Shooting in RAW allows some good control over editing your best images to enhance the results a little too.

Here’s my gallery of the shoot with the best shot I achieved:


“Paul Lennon” – Lennon McCartney Face Mashup in Photoshop

I googled for some cool Photoshop face mashups of John Lennon & Paul McCartney just for the crack but there didn’t seem to be any. Maybe there’s some unwritten law against doing it or something!? So basically I done my own for practice..

Assets:

I found the best, hi-res facial portraits from roughly the same angle I could find in Google. There were many more of Lennon than McCartney!?

Paul McCartney
Paul McCartney

And..

John Lennon
John Lennon

Process:

The Lennon one was much better quality so when I brought them both into photoshop I actually added some noise/grain to the Lennon photo to make it match McCartney better after which I added a couple of master Hue/Saturation adjustment layers to bring everything down to grayscale and control tones.

Step 1: 

The first step was to rotate and align McCartney on top of Lennon precisely, matching eye, nose and mouth positions and using the layer opacity slider for guidance. Once that was done I added a layer mask to McCartney and fairly roughly masked out all but his eyes, nose and mouth using  a very soft brush.

Step 2:

I very carefully cut out Lennon’s glasses and pasted them on a new layer on top of McCartney’s face, masking out the glass part and adding a light grey color to the glass area which I made very transparent.

Step 3:

I manually added some shadow using a soft black brush behind the glasses on the bridge of the nose and top of the cheeks, matching the shadow type of the original Lennon photo.
Step 4: 

I duplicated the McCartney layer and masked out everything but the eye sockets and eyes and then applied a Liquify – Pucker filter to make the eyes look a little distorted through the glass as in the Lennon photo.

Step 5: 

I added some glare on the left eye glass and tidied up the merge by adding some shadows and darkening/brightening some facial areas as well as messing with levels on both photos to match up better.

Finally:

I added master Levels and Photo Filter adjustment layers to unify the tone as well as a retro font with the title of the work.

Here’s the final result:

Paul Lenon
Paul Lenon

Leon

Christina in Red in 2015

A few days ago a friend on Facebook shared a fascinating collection of color photos taken in 1913 by Mervyn O’ Gorman of his daughter Christina using “Autochrome Lumière”, the main color photographic process of the time which involved using glass plates and dyed potato starch! The photos were taken near where I was born 62 years later in Dorset..

I stared at the photos for ages trying to take in the fact that they were taken so long ago, before the first world war, just after the Titanic sunk and about when my grandparents were born. Realising that the girl and photographer are probably long dead, these were brilliant, full color freeze frames of moments of their lives over 100 years ago.

What struck me most about the photos was that although they were taken 102 years ago, they looked as though they could have been taken yesterday, Particularly the one below!?:

Modern Teen!?

So naturally, me being me, the thing to do was Photoshop some modern items into one of the photos! I chose this one below because of the space in the sea to place an object in and also the direction of Christina’s gaze which suggested she was looking at something on the beach:

Original

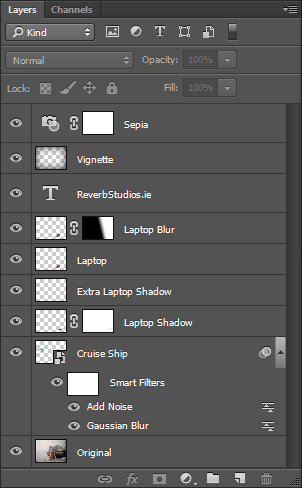
I decided to place a luxury giant Cruise Ship on the sea and a Laptop on the beach. Obvious choices for me and the 21st century! What made the integration a little easier at least with the cruise ship was that, due to the photographic process involved which necessitated a large aperture and narrow depth of field, the background was mostly blurred so I just blurred the ship and added some noise to it, avoiding having to cut the edges out in great detail.

I added a Sony Vaio laptop in Christina’s eyeline and added a little less blur and noise to it as well as shadows underneath to help it sit in the stones better. I also added a slight Vignette and Sepia photo filter to make it look older. The result is below:

new

Here’s a screenshot of my Photoshop Layer setup:

Process

Photoshop Mentoring and Training Leitrim

For anyone in or around Leitrim who’d like to learn the basics of using Photoshop whether it be for personal/hobby use or to improve job prospects etc, I may be hireable under Leitrim LEO’s mentoring program on which I’ve provided mentoring for years now. I can also quote for mentoring outside of that too though.

I’ve found over the years that there’s a major lack of real world Photoshop or general advanced software training in Northwest Ireland. All you ever see is social media, start your own business, taxation, etc training. The kind of stuff most people should easily pickup themselves these days. What about people already established in their businesses and looking to move to the next level in certain areas?

The kind of people who would typically benefit from Photoshop training are:

  • Graphic Designers,
  • Web Developers,
  • Artists,
  • Photographers
  • etc..

I’ve been using Photoshop since about 2003 for personal and business use and have recently gained Adobe Expert status. I can mentor/teach basic use and some advanced techniques such as: Photo Restoration, Photo Editing, Photo Colorisation and more.

PS – I’m hoping to run a 2 day Photoshop training workshop in Carrick-on-Shannon early in 2015 so sign up for my newsletter to keep updated about this. I am also hoping to have an online Photoshop course as well.

Leon

Adobe Photoshop CC Certified Expert Leitrim Ireland

I’m pleased to announce that despite never having attached much weight or significance to qualifications, certifications, exams or courses, preferring instead to learn whatever I specifically needed to know and only when I needed to know it, I have now become officially certified by Adobe in their latest version of Photoshop, CC! The reasoning behind it was that after 12 years of using Photoshop, I thought maybe it was the right time to get some kind of recognition and have something more to show! Also, I hope to use the certification to get more Photoshop work and maybe start to offer some training courses or one to one mentoring so get in touch if that’s what you need.

adobe-cert


I thought I’d sail the exam having used Photoshop for so many years now but the exam was pretty hard and required a fair bit of preparation including taking a few online refresher courses, watching a pile of videos and taking some mock exams online in the weeks leading up to the exam in Dublin’s Exam Centre.

I’m now one of only a very small handful of certified Photoshop experts in Ireland at the time of writing so an exclusive enough club!

Leon – “expert”!

Photoshop Tip: Photo Preparation for Editing & Composition

I’ve been using Photoshop for over 10 years now. Version 6/7 was one of the first pieces of software I got hold of when I bought my first PC back in 2002 and I’ve been using it almost on a  daily basis ever since. My favorite kind of stuff to do in Photoshop is Composition & Editing, where you bring several photographic or even graphical elements together in one job and make it look like they were always meant to be together.

Typically each of my photo composition jobs follows the same process – I come up with some weird idea then go online to find the source files. Normally I just look in Google images for the best quality, hi-res images I can find. This can be a pain for 2 reasons:

  1. All images used in a composition need to match in terms of angle, lighting, levels, etc.. in order to give the best, most realistic results. It can be pretty hard finding these kind of matching files at a high enough quality and I usually end up doing a hell of a lot more editing or  compromising on something, even my initial idea just to suit the material available,
  2. Once you hit “Search Tools – Usage Rights – Labelled for reuse” in Google images results, the number of suitable images you’re allowed use decreases even more dramatically. Also, for the amount of compositions I do, buying suitable stock imagery is too expensive an option.

So what’s the best thing to do?

Even though it adds a lot of time to a Photoshop project, you can wipe out the above 2 problems pretty quickly by creating your own imagery. All you really need is an idea, a decent camera, a tripod, some free time and maybe some decent weather if it’s an outdoor shot. Creating your own shots obviously isn’t possible if you want to be working on fantasy stuff involving dragons etc but I find that if you Photoshop everyday situations, the resulting subtlety can actually impress a bit more then OTT stuff.

For example:

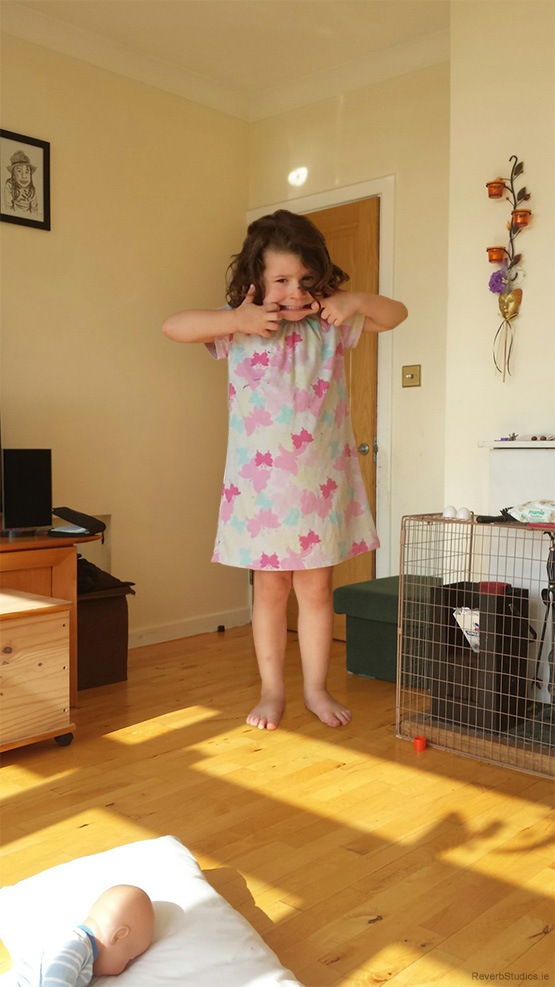
I was hanging around the house and garden with the kids over the weekend and a couple of ideas came to me so I grabbed all I had (Smart Phone Camera) and took a few shots of the girls as they played. For each shot I took, I asked them to move out of the frame and took another shot immediately after while trying to remain as still as possible. What this does is give me 2 fairly identical shots in terms of lighting and angle etc..with the only difference in both photos being the presence of the subject I planned to Photoshop. You then simply bring both photos into Photoshop and cut the subject out and place it in the second shot with no subject. It should blend in straight away with little further editing but you can move it around, resize, rotate etc without it looking too out of place..

Ideally, you’d plan the shot a bit more in advance than I did here, maybe having your subject pose in some special way then use a proper hi quality camera mounted on a tripod but it was a lazy, Sunday afternoon when I done all this so wasn’t in the humor of digging all the stuff out! There was a little bit of posing in the “Fairy” shot below as I asked Hanne to jump off that play frame to try capture her mid air. I then just resized her smaller and added some wings and a shadow! In the other pic I just snapped Ellie doing her thing then just made her bigger!

Even though there’s not much planning and I used a phone camera, I think the realness of the results are impressive?

More of my Photoshop stuff is on Pinterest.

Hanne-Angel

Ellie-Giant

For Dummies Book Cover Photoshop PSD Template

I’ve been meaning to do a few customised “Dummies” book covers in Photoshop but you gotta start with a nice blank canvas so knocked an editable template up this morning based on a typical cover off their own website.

Download the Photoshop PSD below.

It’s 300 DPI and 2381 x 3000px.

PSD Template

Dummies PSD Template

For those without Photoshop, here’s a cool “For Dummies” generator!

Covers.dummies.com