How to Check if your Mobile Hits are Down after Google’s “MobileGeddon”

So yesterday April 21st was “MobileGeddon” as it’s become known. The day Google  decided to change it’s algorithm to rank higher those websites which have Mobile Friendly or Responsive versions available to viewers on mobile devices including phones and tablets etc..

Mobile Friendly

I’ve been doing some comparative searches (make sure to sign out of your Google account as results might be skewed if you don’t)  on both desktop and mobile to see if I can see any difference in results but havn’t spotted anything obvious yet. I guess it might take a while to kick in?

Perhaps the best way to check if your site has been affected though is to login to your Google Analytics or similar account and check the stats for mobile hits. Wait a few days or weeks before doing this to give the stats a chance to build up. Here’s how to do that:

  1. Login to your Google Analytics account and click Audience – Mobile – Overview to see some quick stats.
  2. The overview data above is kinda hard to read so lets make it a bit clearer by selecting a date range. I suggest picking custom dates top right from about the 13th April to the 27th April to give one week of data before the change on the 21st and one week after.
  3. Next, tick the boxes beside Desktop, Mobile & Tablet bottom left and choose “Plot Rows” just above. This will give a nice tidy comparison chart for the period in question. See below:

Google Analytics

What you’re hoping NOT to see is a big obvious fall in mobile and tablet hits from the 21st onward. If you do and your site fails the Google mobile friendly test then you might need to consider making it mobile friendly?


Google Ranking Mobile Friendly Websites Higher from April 21st

“Starting April 21, we will be expanding our use of mobile-friendliness as a ranking signal. This change will affect mobile searches in all languages worldwide and will have a significant impact in our search results. Consequently, users will find it easier to get relevant, high quality search results that are optimized for their devices.”

Read Google’s full announcement here – Googlewebmastercentral.blogspot.ie/2015/02/finding-more-mobile-friendly-search.html

mobile-friendly

I’ve noticed this in news posts around the web in recent times and have had clients asking me about it. I guess it’s the way things are going with more and more people accessing online content via mobile devices and Google are probably right to reward sites with higher rankings if they satisfy this trend. Nevertheless I can’t help feeling a little annoyed for 2 reasons:

1. Google I’m sure know that to make a website mobile friendly or include a separate mobile domain completely is possibly a big job and big outlay for companies. Doing a little seo tweaking is one thing but expecting companies to either completely re-build their sites to make them mobile friendly or building an entirely new website is asking a bit much in my opinion.

2. Web design clients are quite likely (some of mine have already) to expect their website to be mobile friendly already even though it might have been built before smart phones were even invented and they might expect the site to be “fixed” for free as if it were broken in some way.

So potentially massive hassle all round because of this.

What to do?

I guess if you are conscientious about seo and Google rankings etc you may need to act on this rather soonish. If you happen to have a WordPress site or possibly any modern CMS powered site there may be plugins you can install that will show basic mobile versions of your site’s content. Failing that you’re probably looking at a full rebuild with a responsive design. Again, a little easier if you have a WordPress or CMS site but not so easy if you have a static, custom built one.

You can test your site to see if Google thinks it’s mobile friendly or not here – Google.com/webmasters/tools/mobile-friendly/

Contact me for advice if you feel the need.

Leon

Redirect Old WordPress URLs to New When Moving or Rebuilding a Website

I’ve just moved my self hosted WordPress blog which was also my main business site with some static pages, to a WordPress hosted blog and replaced the self-hosted one with a static, hand made PHP/HTML website, with all new urls!

It’s proven to be a bit of a bigger job than I expected to redirect old urls that people and google might have indexed in such a way that any SEO merit I’ve gained over the years would not be lost.

Here’s what I done following some research online and while it’s not perfect and some urls are going to slip through the net or at least make people work harder to try find, I’m pretty happy with the outcome:

Step 1 – Transfer the content:

Transferring the content was easy enough. I simply done an export from my self-hosted WordPress admin and re-imported on WordPress.com. It usually works fine but some images might get lost. This will bring in Posts, Pages, Images, Categories, Tags, Comments…pretty much everything you need.

Step 2 – Replace old content:

I deleted all self-hosted WordPress files then built a new static site to replace the self-hosted WordPress site. The only thing to note here is that you should try match new url’s to old ones if possible, at least for the static pages that might have been on the old WordPress site. This will most likely involve using some code to create “pretty urls” though. More of that later.

Step 3 – Identify URLs to be redirected:

This is the hard bit! For me, all static page urls on my old site had to be redirected to the new url. I had to setup manual redirects for this even though the only difference in url might have been the addition of a .php or .html extension at the end. That was the easy bit but what about categories and single blog posts that might have been indexed quite well in google? My category list was fairly static so I could manually redirect each one similar to pages but unfortunately my permalink structure for single blog posts was a bit weird, ie – each url had a random number followed by the post title. If I’d have included the word “blog” in the url it might have made things easier!I basically had a good look through my post history on the new blog and identified the “most important” blog posts, ie – ones with affiliate links of just the most popular ones and even googled to see which posts came up highest. I also looked at my Google Analytics account to see which were the top bog posts viewed. Once I had a list of posts I was able to add redirect code for each post. See below:

Step 4 – Add the Redirect Code:

I added all my redirect codes to a .htaccess file in my website root. Here’s an extract below that should show and explain each redirect type:


Options +FollowSymLinks
RewriteEngine On
RewriteBase /

#Redirect Old WordPress Pages
Redirect 301 /web-design/ /web-design.php

#Redirect Old WordPress Categories
Redirect 301 /category/wordpress-tips/ https://reverbstudios.wordpress.com/category/wordpress-tips/

#Redirect Old WordPress Posts
Redirect 301 /67/web-design-leitrim/ https://reverbstudios.wordpress.com/2008/03/27/web-design-leitrim/

Step 5 – All Other URLs:

For anything else that might be in google but you haven’t redirected, it will end up on a 404 – not found page on your site/server. To get around this I simply created a new error 404 page with the same design as the rest of the new static site and put a line in the .htaccess file to redirect all missing pages or posts to that. Here’s the line:

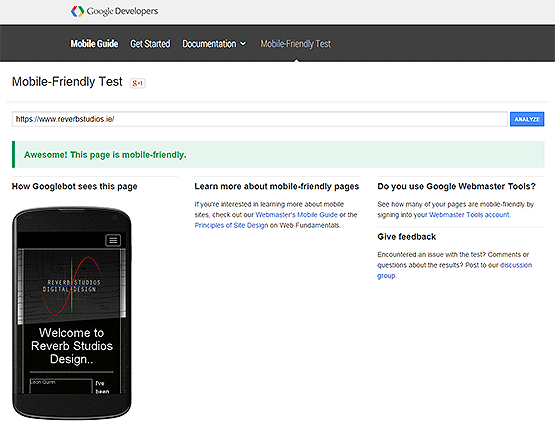
ErrorDocument 404 https://www.reverbstudios.ie/404.php

Step 6 – Submit New Sitemaps:

Finally, I went into my various webmaster tools sites, ie – Google, Bing, Yahoo etc.. and deleted the old sitemap and added another new one.

As I said, this seems to work quite well for me but might not be an exhaustive list of things to do so please feel free to add anything I might have left out in the comments below.

Leon

How To Add WiFi & Online Sharing Functionality to older DSLRs

I got my first pro level Digital Camera/DSLR a little while ago, a Canon EOS 500D and one of the first things I noticed was that when I took a photo, I couldn’t do anything more with it until I got it on a PC! I’m too used to taking pictures with the phone camera and instantly sharing them to Facebook, Twitter etc..

Newer DSLRs will probably have WiFi functionality built in but mine is an older model with none so I googled around for some kind of Canon WiFi attachment that would allow me to transfer or share photos wirelessly. What I came across was something I’d never heard of, an “EyeFi WiFi SD card“! It works just like a regular SD memory card and comes in different capacities like 8MB, 16MB & 32MB but it has a WiFi chip on it too that communicates with other WiFi devices like your PC, Laptop, Smartphone or Tablet.

Setup:

I got the 8MB EyeFi Mobi card. All I should need really. It costs about €40 including postage from the Apple Ireland online store which was the cheapest source online according to PriceSpy.ie. Simply install the EyeFi phone or Desktop app then insert the EyeFi SD card in your DSLR and turn on. The pairing process happens automatically via the phone/desktop app and you’ll be asked for the activation number that comes with the card during the process. When the SD card and app are paired just start taking pics! In a matter of minutes the photos appear in the phone or desktop app.

Sharing & Online Backup:

I noticed on my Samsung Galaxy 4 Android phone that when the photos transferred to the EyeFi app, they also when into my Google Photos and I have them set to automatically back up, full size to the Google cloud so that was damn handy! However, you can also sign up for EyeFi cloud which is around €40 per year for unlimited storage with the first few months free. Photos are then backed up to the cloud as well as your device. Once the photos are on the phone in the EyeFi app or cloud you can obviously share them via your preferred service.

Also, using IFTTT.com you can set up many scenarios such as every time a photo is uploaded to EyeFi cloud it goes to Dropbox too which is cool.

Note: 

The EyeFi app and cloud only automatically transfers JPEG images not RAW.

How to take a Screenshot on a PC, Laptop or Phone

I seen on Google Trends recently that one of the top search terms in Ireland for 2014 was “How to Screenshot” so here’s a blog post in case those people couldn’t find what they were looking for 😉 I’ll try to stick to default/native solutions that don’t involve third party apps or programs.

PC/Laptop:

Simply press the “Print Screen” or “PrtScn” button. This snaps a copy of the screen to the clipboard and you can then paste it wherever, ie – into Microsoft Word, Paint etc.. To copy only the currently active window then press “ALT + PrtScn”. More recent versions of Windows might have a dedicated tool installed that can capture more precise sections of the screen and do annotations etc. Go to the start menu and search for “Snipping Tool”.

Mac:

Hold down CMD + Shift + 4 then release and you’ll see a crosshairs you can use to specify an area of the screen to shoot.

Phones:

Smart phones all work in roughly the same way usually involving holding 2 buttons at the same time. It can be pretty tricky getting the timing right though!

Samsung Galaxy Phone:

Press and hold both the Home + Power/Standby buttons until the screen flashes and a camera sound is heard. A screenshot is generated and saved in your gallery.

iPhone:

Press and hold both the Home + Wake/Sleep buttons. The screen flashes when the screenshot is taken. The screenshot is generated and saved to your camera roll.

iPad:

See iPhone!

Third Party Software:

You can also use more fully featured solutions. Here are some of my favourite ones:

Jing

Snagit

Leon

Photoshop Mentoring and Training Leitrim

For anyone in or around Leitrim who’d like to learn the basics of using Photoshop whether it be for personal/hobby use or to improve job prospects etc, I may be hireable under Leitrim LEO’s mentoring program on which I’ve provided mentoring for years now. I can also quote for mentoring outside of that too though.

I’ve found over the years that there’s a major lack of real world Photoshop or general advanced software training in Northwest Ireland. All you ever see is social media, start your own business, taxation, etc training. The kind of stuff most people should easily pickup themselves these days. What about people already established in their businesses and looking to move to the next level in certain areas?

The kind of people who would typically benefit from Photoshop training are:

  • Graphic Designers,
  • Web Developers,
  • Artists,
  • Photographers
  • etc..

I’ve been using Photoshop since about 2003 for personal and business use and have recently gained Adobe Expert status. I can mentor/teach basic use and some advanced techniques such as: Photo Restoration, Photo Editing, Photo Colorisation and more.

PS – I’m hoping to run a 2 day Photoshop training workshop in Carrick-on-Shannon early in 2015 so sign up for my newsletter to keep updated about this. I am also hoping to have an online Photoshop course as well.

Leon

The Ultimate Online Payment Option?

I thought I was pretty smart with the payment options I offer clients on my Payment Form. Always offer choice they say. Make it easy for people to pay you they say! So I offered 4 methods:

  1. Credit Card (via Stripe),
  2. PayPal,
  3. Bank Transfer,
  4. Cheque.

Cash in a brown envelope isn’t on the list but obviously I’d take that too!

The latest option I added, Stripe is very cool. Finally being able to take a credit card payment with minimum hassle is awesome BUT. There’s hassle involved with all of the options above. Stripe credit card is probably the easiest method for my clients but I get stung a bit in fees from Stripe. I also get stung with fees from PayPal. Cheques are hassle for both sides and is the slowest method so that leaves bank transfer. When you chose Bank Transfer on my payment form above all it does is give you my bank details but clients then have to go setup a beneficiary in their online banking accounts before they can transfer.

Here’s what I’d like to see..

Electronic Funds Transfer


Some kind of automatic bank transfer method that combines the ease of payment that stripe credit cards offer the client, combined with the low fees of accepting bank transfers. My clients could fill out a form on my site, entering their bank details, name and payment amount and when they click submit my own bank withdraws the money from their account instantly then notifies me that I have funds.

Is that too much to ask!? We’re already doing it in an arse about tit, slow, inefficient and costly way right now. It just needs some tweaking.

Leon

New Home Page for ReverbStudios.ie

I’ve decided to replace my home page with a less wordy, call to action rich landing/intro page inspired (perhaps! Sshhh..) by Windows 8 tiles and flat design! I think the new design which features links to all my various Social Networking profiles makes sense since I probably communicate more through those channels than anywhere else on a daily basis and I think it’s a nice idea that my website should be the hub for that. I’ve taken time to cultivate pretty much every social network mentioned and have good followers, content and interactions on all of them.

My old home page with a wordy introduction is still available at ReverbStudios.ie/Home/ and you can get to that by clicking “Home” in the menu bar top or return to the intro/landing page by clicking “Intro” at the bottom.

Let me know what ye think?

Leon